1. Dashboard
  2. Blog
    1. Artikel
  3. Forum
  4. Galerie
    1. Alben
    2. Karte
  5. Shop
    1. Hilfe
    2. Bestellungen
    3. Versandkosten
  6. Marktplatz
    1. Nutzungsbedingungen
    2. Karte
    3. Bewertungen
  7. Mitglieder
    1. Letzte Aktivitäten
    2. Benutzer online
    3. Team
    4. Mitgliedersuche
  • Anmelden
  • Registrieren
  • Suche
Blog-Artikel
  • Alles
  • Artikel
  • Seiten
  • Forum
  • Blog-Artikel
  • Galerie
  • Produkte
  • Marktplatz-Eintrag
  • Erweiterte Suche
  1. Oles Techblog
  2. Blog

Blog-Artikel

  • RSS-Feed
Oles Technik & Smarthome Blog
Qidi - changing bed leveling location

Changing bed leveling spots

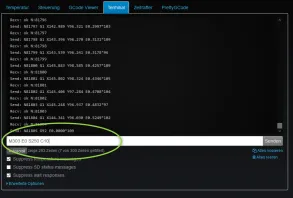
This is very simple via the following commands (examples)

(Quelltext, 4 Zeilen)

just change the X or Y values to your needs and save the config. To get an idea of the right positions you can read the current ones from the config dump (search for the lines starting with M8036) and adap with x or y offsett to move to your wanted one.

Note: The same M code seems to be correct also in the config dump it is just a sequence of M8036 commands.

Done - so far my shortest blog I think :) Haha - it was now (2022) a lot longer

Example values

My iMate-S

(Quelltext, 4 Zeilen)

Factory Defaults

I-Mate

(Quelltext, 3 Zeilen)

X-Max

(Quelltext, 3 Zeilen)

X-Plus (same as iMate-S)

(Quelltext, 3 Zeilen)


Weiterlesen

Olaf Krause
23. Mai 2021 um 16:36
Haha 1
3
Oles Technik & Smarthome Blog
Qidi - 3D Druck Extruder Kalibrierung

Extruder Kalibrierung

For english or other languages please use your browser translate plugin - sorry.

Im folgenden eine einfache Prozedur um Euren Extruder zu kalibrieren. Idealerweise (Theorie) macht man dies ohne eine Düse montiert zu haben. Es geht schließlich darum wieviel Filament der Extruder vorschiebt, nicht darum wie lang unten der Faden aus der Düse kommt. Ohne Düse -> weniger Gegendruck, welcher potentiell (wenn auch gering) das Ergebnis verfälscht. In der Praxis eher schwierig umzusetzen - also entweder eine möglichst große Düse dran lassen oder wenn nicht vorhanden mit der Abweichung leben.

  • Achtet drauf, das Ihr den richten eStep startwert nimmt (eStep unterscheiden sich von Extruder zu Extruder abhängig von der Mechanik)
…


Weiterlesen

Olaf Krause
23. Mai 2021 um 16:29
22
Oles Technik & Smarthome Blog
Qidi - PID Tuning

PID Tuning using the Qidi 3D Printer

Important note 2022-04-07:
Seems Qidi has broken the Autotune in 4.2.14.x Firmware (assumption due to observation and customer reports) - so be careful doing the PID autotune at least backup (as always) your current config. See also my thread PID Tuning testing PID tuning with the MAX. Conclusion take stock values do not execute the PID tuning.

Using a terminal like Octoprint

just type:

(Quelltext, 2 Zeilen)

where you replace the S220 with your wanted targettemp. If done and everything works as expected save the config using.

If you use part cooling please use it while PID tuning as well. Same for the heatblock socks. The U at the end tells the printer to immediately use the result.

(Quelltext, 1 Zeile)

…


Weiterlesen

Olaf Krause
23. Mai 2021 um 15:50
3
Oles Technik & Smarthome Blog
Qidi Extruder Upgrade - Chad Mod

Intro

I wrote already plenty of descriptions (mainly in german) about this mod, but I thought lets do a blog article about it as for the Herkules Mod to have it also bit more modular and in english for non Germans.

Wichtig: Wir sind nicht verantwortlich for irgendwelche Schäden. Bitte nutzt die Anleitung und die Upgradeteile auf Euer Risiko.

Important: We are not responsible for any damage. Use responsibly and at your oww risk

As the Qidi X-Plus and X-Max is regulalry suffereing a clogged nozzle/ the extruder gears are no longer able to transport the filament there are several modifications out there to improve this. On top Qidi uses propriatary hardware which could also be replaced by more "standard" one for easy replace and maintenance so…


Weiterlesen

Olaf Krause
21. Mai 2021 um 18:41
0
Oles Technik & Smarthome Blog
Qidi Printer - How to do a config backup

Config Backup of your Qidi

Please do a config backup as first step always before you change anything on your printer. You can open and look at the config using a simple editor like notepad++.

The backup might be very helpful later on in case you need to know which values were set at the time you took the backup.

To do so run the following as gcode on your qidi. Details will follow below:

(Quelltext, 1 Zeile)

This zip includes the command as an example: BackupConfig.zip

As you know you can excute many command on you printer by placing them into a so called "gcode" file and print them. Means you can create a file with your editor (ASCII Editor like NotePad++) or unzipg the attached file and use this. To execute

  1. Save the file contained in
…


Weiterlesen

Olaf Krause
21. Mai 2021 um 18:12
2
Oles Technik & Smarthome Blog
Qidi Extruder Upgrade - Hercules Mod
Hello,

this time in english as there might be also people outside German speaking countries interested in this...

youtube.com/watch?v=F8fr1GxiXic

Intro

And an important disclaimer - especially if you are not yet expert in in to handle and modify a 3D printer:

  • Wichtig: Wir sind nicht verantwortlich for irgendwelche Schäden. Bitte nutzt die Anleitung und die Upgradeteile auf Euer Risiko. Wir verkaufen hier kein fertiges Produkt, sondern die Teile für Euch zusammengestellt und optional zusammengebaut um Euch Aufwand zu ersparen.
  • Important: We are not responsible for any damage. Use responsibly and at your own risk. We do not sell a finished product here, but the parts put together for you and optionally assembled to save you effort.
As…


Weiterlesen

Olaf Krause
8. Mai 2021 um 07:28
17
Oles Technik & Smarthome Blog
How to take a full PI backup towards a windows samba server

Step 1: Install samba client stuff on the PI

(Quelltext, 3 Zeilen)

to remove mount just use umount /mnt/samba_server

to mount permanently add somthing like


(Quelltext, 2 Zeilen)

to your /etc/fstab. yourcredentialfile should look like

(Quelltext, 3 Zeilen)

Step 2: Check if access works like

In my case the it looks like

(Quelltext, 10 Zeilen)

Step 3: Use DD to take the backup

check fstab for your shares if you forgot what you did in step 2 :)

(Quelltext, 5 Zeilen)

and lsblk for your drives

(Quelltext, 5 Zeilen)

then you can execute something like

(Quelltext, 2 Zeilen)

Depending on the size it might take a while!


Weiterlesen

Olaf Krause
13. März 2021 um 09:33
0
Oles Technik & Smarthome Blog
Tuning Bed-Level Nuts for Qidi X-Max/Plus
Moin Moin,

hier ein kurzer Bericht zur aktuellen Änderung an meinem Qidis. Es geht um die Levelingschrauben. Leider ist es so, dass die originalen Flügelmuttern zum kontern und die Muttern zum Einstellen sehr unergonomisch sind. Sprich sie sind zu klein (viel Kraft nötig) und scharfkantig. Noch dazu lösen sie sich gerne ein wenig bei längeren Druckaufträgen.


links/Oben in schwarz neu - links/unten die Originale, mitte eingebaut, rechts gut anziehen.

Die Federn werden durch einen Silikonpuffer ersetzt und ide Flügelmutter/Drehmutter durch eine größer Mutter aus Polycarbonate und eine 4mm Stopmutter die dort eingepresst wird.

Mein Fazit:
Das upgrade lohnt sich! Leveling geht deutlich einfach und es verstellt sich kaum noch. Gerade weil…


Weiterlesen

Olaf Krause
16. Oktober 2020 um 18:51
9
Oles Technik & Smarthome Blog
PID Tuning Qidi X-Max/Plus via OctoPrint

PID Tuning für Qidi X-Max und X-Plus 3D Drucker

PID (Proportional Integral Derivate) Tuning ist notwendig um den Temperatureinschwingvorgang an der Düse oder dem Bett zu optimieren.

Autotuning start

Dazu kann man einen Autotuningprocess im Drucker starten. Der Befehldazu lautet: M303 <extruder> <Zieltemperatur> <wiederholungen der Messung>

Beispiel:

(Quelltext, 1 Zeile)


Wenn jetzt in dem Fall zehn Einschwingvorgänger bei einer Temperatur von 250Grad am Extruder 0 abgeschlossen sind kommt in etwas so etwas vom Drucker zurück:

(Quelltext, 4 Zeilen)

Das zeigt aber auch - man könnte den Prozess zwar mit einer zu druckenden Datei und einer SD Karte starten, aber man kann ermittelten Werte nicht sehen oder ändern.

Anmerkung: evtl. funktioniert es…


Weiterlesen

Olaf Krause
12. Oktober 2020 um 20:02
6
Oles Technik & Smarthome Blog
Qidi X-Max X-Plus / X-Max mit OctoPrint
Moin liebe Freunde des 3D Drucks,

heute geht es drum wie man Qidi X-Max oder den X-Plus via USB an einen OctoPrint server anschließt:


Octoprint ist eine Opensource Software zum Drucken via Webinterface also von entfernten Orten machbar und nicht nur wie standardmäßig via SD Karte. Weiterhin bieten Octoprint WebCam anschluss etc. - macht einem also die Überwachung des Druckes auch deutlich einfacher.

Dummerweise erlaubt das vordere USB Interface des Druckers keine Verbindung ist also nur für die SD Karte gedacht. Auf dem Motherboard befindet sich aber eine serielle Schnittstelle die wir nutzen können.


X-Plus: Schnittstelle, TTL zu USB Converter, Gesamtansicht
VCC nicht anschließen (habe ich mittlerweile auch nicht mehr) - braucht es…


Weiterlesen

Olaf Krause
14. August 2020 um 19:32
23

Kategorien

  1. Erneuerbare Energien und E-Mobilität 118
  2. Computer und IT 46
  3. 3D Druck 20
  4. Hausrenovierung & Sanierung 19
  5. Auto 97
  6. Smarthome 9
  7. Reisen 72
  8. Sonstiges 2

Schlagwortwolke

  • 22kW
  • AC
  • akku
  • Amazon
  • Auto
  • Batterie
  • BHKW
  • BMW
  • Challenge
  • Deutschland
  • elektrisch
  • Elektroauto
  • Energiewende
  • eRUDA
  • ERUNE
  • Extruder
  • Fussbodenheizung
  • Gadgets
  • Haus
  • i-Team
  • i3
  • IP-Symcon
  • IPS
  • KNX
  • KWK
  • Lifter
  • lofoten
  • Mod
  • Model 3
  • Norwegen
  • Planung
  • Produkttest
  • Qidi
  • Raspberry
  • Reise
  • Reiseberichte
  • Roadrip
  • Roadtrip
  • Schlüter
  • Schweden
  • SIP
  • SoC
  • Tesla
  • Traum
  • Trunk
  • Tuning
  • Ubuntu
  • VoIP
  • WebApp
  • Übergabe

Heiß diskutierte Artikel

  • 100% Erneuerbare ist das möglich?

    1 Kommentar
  • Paragraph 14a was bedeutet der in der Praxis - Kurzzusammenfassung

    1 Kommentar
  • Hybrid Netz und Insel-system für daheim

    0 Kommentare
  1. Datenschutzerklärung
  2. Impressum
Community-Software: WoltLab Suite™ 6.1.8